Projects
You can add a new project with the round plus button. After clicking on SAVE PROJECT, further tabs for configuring your project will appear.
The following actions can be performed in the action menu in the gray area:
- show only active projects
- Delete project (only possible if there have been no check-ins)
In the filter bar above the project list, you can filter according to the following criteria:
- Channel
- Brand
- Project ID
- Project name
- Time period
The project in detail
In order to be able to create events in the event calendar (e.g. the promotion of your customer’s product), it is necessary to create a project first.
The project forms the basis and combines all data models (users, locations and their structure, brands and products). For this reason, it is essential to create or even import all basic data before creating the project – e.g. maintenance of brands, product groups and products; users and locations in which the events are to take place.
If you want to use a previously created location (which you are already visiting for a project, for example) for a new project for another customer, the location created in EMPPLAN is actually the same. The aim of EMPPLAN is to prevent data redundancy. However, the location to be added in the new project will differ from the location in another project in terms of its structural data. For example, the brand, area name and channel may be different
To be able to create events for a project, data must be stored in the following tabs :
- Project data
- Locations
- Project user
If you want to duplicate a project, you can do this in the action menu within the project. You can rename the new project and also select which data should also be copied. You have the following options here:
- Reporting
- Users
- Locations
- Budgets
- Contracts
To create a new project, at least the following mandatory fields must be completed in the Project data tab:
- Project name
- Start date (if an end date is specified, events can only be created up to this date)
Further data that can be maintained optionally:
- End date (to limit event creation – no more events can be created after this date)
- Project ID (your ID for the project)
- Cost center (your cost center for the project)
- Passage (your ID for the project passage / flight)
- Element (obsolete – will be removed soon)
- Notes
Customer budget management
Customer budget management gives you as an agency and your industry customers a live overview of the budget status. A distinction is made between allocated, used, planned and still available budget. You can activate customer budget management at project level. You can also define the event status from which EMPPLAN should assign an event to the used budget. You can define this individually for each project.
After activating customer budget management, you should define at least one event type that you want to use on the project. When creating an event, an event type must then also be assigned so that the customer budget management module can carry out bookings.
You can find out more about how it works here.
Warehouse management
Here you can activate the stock management module for the project. If this is activated, stock entries are made automatically when transactions (e.g. product sales, product deliveries) are posted by event users. For example, if an event user reports product X, this is deducted from their personal stock.
You can find out more about stock management here.
Internal project documents
Here you can store internal documents such as offers etc.. These are only accessible to admins with project access
Customer
The data provision for customers can be configured in this tab. Here you can decide which data types you want to share with your customer and which not. For example, if you deactivate e-mail, your customer will not see the e-mail addresses of your event users.
Project contract management
Project contract management creates a contract for each project user. EMPPLAN uses a lock screen to ensure that all relevant users in the project agree to your contract. Without consent, further work with EMPPLAN is not possible for your event users. Classic use cases are, for example, project-specific codes of conduct that must be approved. If you would like to conclude contracts for global data protection regulations or agency framework agreements, you can also store your contract texts in global contract management in the EMPPLAN settings.
General information on contract management in EMPPLAN
- After clicking in the action menu, you can store one or more versions of your contracts and define all or certain user or user groups (teams) as contract recipients. Please note that you must always maintain the English language, which is displayed as an alternative language if the contract is not available in an active user language.
- If a user agrees to a contract, this is documented in the user profile in the Legal tab and cannot be changed. In addition to the contract text, the time stamp and the IP address at the time the declaration of intent was submitted are also saved.
- The contract texts can be dynamized and personalized using placeholders. For example, you can use event location, event date, remuneration agreements, product commissions, home address, dates of birth, tax numbers, etc. in the contract. Please contact EMPPLAN Support, who can provide you with an up-to-date list.
- All contracts can be downloaded as a pdf before and after consent and can therefore also be saved and printed.
Event contract management
Event contract management creates a contract for each event and event user. The acceptance of an event by the event user is not possible without consent. General functions and processes are described in the previous section.
Labels
In EMPPLAN, labels work like sticky notes that you can stick on event groups and events – just as you wish. For example, if you want to indicate that 5 users are on a club tour in Berlin Mitte with their events in an event group, you can create a label called “Clubs Berlin Mitte”, activate it for use on event groups and then assign it to the event group. If you want to indicate that one of the 5 users is absent due to illness, use a label at event level and assign the label “Absence due to illness” to one of the users.
Labels can be filtered in all views. The data is also provided in relevant exports and, of course, in the EMPPLAN IO API.
The following standard labels are already created and can be activated in each project:
- confirmed by agency This label can be activated as an event label and used in the application process when an event is confirmed by the admin.
- rejected by agency This label can be activated as an event label and used in the application process when an event is confirmed by the admin.
- Absence due to illness This label can be activated as an event label. Admins can use the label to inform event users and customers that an event day could not be held as planned.
- Checked-in by supervisor This label can be activated as an event label. Admins can use the label to carry out forgotten check-ins on behalf of the event user. The process is recorded transparently in the event details.
- Application This label can be activated as an event label. However, the label is also set automatically by EMPPLAN when users apply directly to events.
If you want to use a label in a project, click on the corresponding selection box in front of it and activate the label via the action menu for use on event groups and/or events. The label can then be assigned via the quick view and via the event groups.
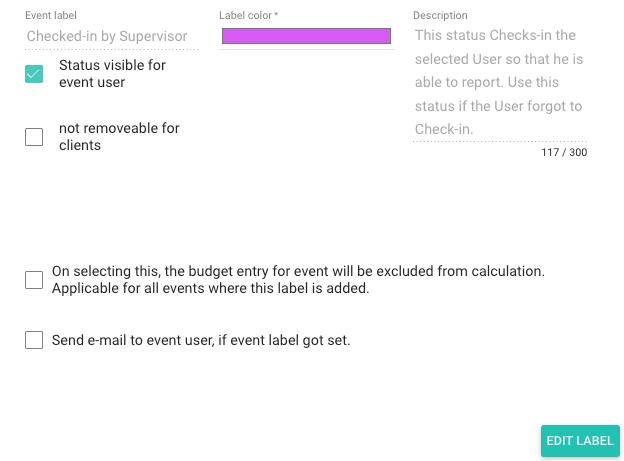 If you would like to edit an existing label, click on the corresponding selection box in front of it and select Edit label via the action menu. You can configure the following values:
- Label name (cannot be changed for some standard labels)
- Label color (can be changed individually)
- Description (for internal process notes)
- visible for event users
- cannot be removed by customers (usually makes sense for group labels, e.g. if customers are also allowed to release budgets via labels)
- Budget correction (If you select this option, the budget entry for the event is excluded from the calculation. This applies to all events for which this label is used)
- This event label triggers an e-mail dispatch.
- E-mail subject
- E-mail content
Customer budgets
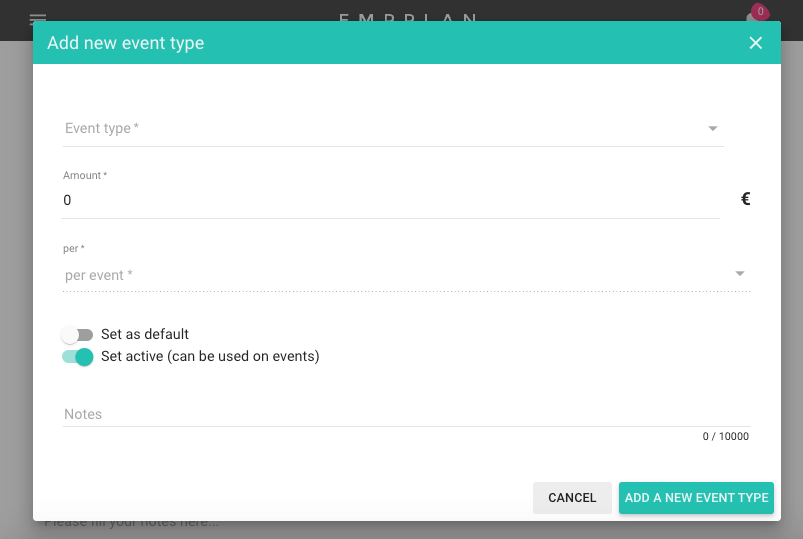 Here you can activate event types that may be used on this project. Required event types must first be created globally in the EMPPLAN settings. If you have activated customer budget management on a project, you must also use at least one event type there, otherwise no budget bookings can be made.
The following can be entered for each customer budget data record:
- Event type (name of an event, e.g. sales event, tasting promotion, helper, team lead)
- Amount per event (amount in your standard currency that is deducted from the customer budget when the budget is used)
- define as standard (this event type is preselected by default when creating new events)
- active (can be used on events) (Only active event types can be used to create new events. Events with deactivated event types remain unchanged)
- Notes (for internal process instructions)
Further data
You can create and manage project-specific additional fields on the Additional data tab. Newly created fields automatically appear on all your projects and can be filled in. You can create the following data for each data record:
- Field name (field description)
- technical field name (field name in the database structure / EMPPLAN IO API)
- Markers (this is obsolete at this point and does not need to be maintained)
- Select projects to display the value to event users (this is obsolete at this point and does not need to be maintained)
Within this tab, you can influence the behavior of events and adapt functions and processes to your desired project-specific way of working
Location
Dynamic location – switch to use Google Locations for event bookings. This allows you to book events in locations that do not have to be created in EMPPLAN beforehand. For the data structure, however, this means that these locations cannot be assigned to any channel or area, which can also have disadvantages in some processes. The EMPPLAN support team will be happy to advise you on this
Event Flow
Published events are automatically accepted – If this function is activated, the event user does not receive an event request. EMPPLAN automatically accepts the event on his behalf. This can be used, for example, in the case of work relationships based on instructions and speeds up your planning.
Client users can schedule users – Do you like working digitally with your customers? If this function is activated, your customers can create event groups limited to the locations assigned to them in their area of responsibility. This does not give customers access to the personal data of event users. The event groups receive the event status Customer request and can then be staffed by admins.
Client users can publish events – Are you working more closely with a customer? Then use this function so that your customer can even plan users and thus fully staff event groups. Please always observe the legal data protection requirements in your country.
Limit project to field service events – If you activate this function, the entire project will be converted to a field service project. Classic promotions can then no longer be mapped. However, the users, usually field service employees, can then create their events in the calendar completely independently. Please contact EMPPLAN support for more information.
- Activate check-in / check-out for field service users on event group (only relevant for field service events) – You can use this function to control whether field service employees should check in and out at events they have created themselves.
- Show reporting as dialog (only relevant for field service events) – If field service employees are to use transactional reports in addition to event group and event reports, you must activate this function.
Communication
Activate messenger on event groups – Here you can show or hide the messenger at event group level
Event group configuration
Location details – Here you can display additional fields you have created at location level, e.g. relevant for brand or customer-specific location numbers etc.
Show a warning to the field service to select a product group for their visit (only relevant for field service events) – Do you use EMPPLAN for field service purposes and have the setting “Limit project to field service events” active? Then you can specify here that reports must always be entered for specific product groups
Event report pdf
- Hide download reporting – EMPPLAN offers you the possibility to summarize the desired reporting data on a pdf and download it as a so-called reporting. If you do not need this, you can hide this download option on the event details page.
- User receives accepted reporting by e-mail – If you activate this option, the event user will receive the reporting as a pdf by e-mail as soon as you have accepted the event
Client dashboard limitation
Here you can configure which events your customer is allowed to see. If no entries are made here, your customer can view events in all statuses. If you limit the events to a few statuses, your customer will only see success data for these events in their dashboard. Please note that the limitation does not apply to the calendar view
Check-in behavior
Force location sharing – You can force the user to share their location when checking in. The user can then only check in with location data. They will receive a corresponding message in their browser, which they must confirm. Please make sure that you are allowed to activate this function in your country. This may be restricted by local legislation.
User can only check in within x km of the event location – Here you can define a radius within which check-in should be possible (geo-fence).
Push notification in case of missing check-in – EMPPLAN can remind the event user of a missing check-in via push notification at your request. Please note that this function can also be deactivated by the respective user
Client dashboard – Event overview
Show product matrix – Do you use product reporting in your project, e.g. for merchandiser runs? Then activate this feature to also display the results of product reporting in the event overview table. All desired fields will then appear as an additional column for each queried product.
Geolocalization for uploaded images [Premium Feature] – Would you like to print the exact address at the time the image was taken? Then activate this feature. The corresponding upload fields must also be activated for the feature. You can find out more in the Reporting section. Please note that this will incur additional costs per image
Do not show historical report data
Do not show historical report data (only relevant for field service events) – Deactivate the function to prevent field service users from accessing historical report data
Limitation for customer requests
Blocked days from the current day – Do you let your customer create events in the calendar? Then you can define here that your customer
Under payment profiles, you can define and edit a commission scheme and all remuneration components (so-called commissions) for event users (e.g. promoters, merchandisers, sales representatives, etc.).
For example, you can define a remuneration per event (e.g. location visit, promotion assignment, etc.) or a remuneration rate per hour. Based on check-ins and check-outs, EMPPLAN automatically registers the pages used or events held and calculates the remuneration for each event user on the basis of each event.
The following commission types are available to you:
- Project commission
- Check-in commission
- Reporting commission
- Top Stop (function for limiting event remuneration)
Project commission
Under Project commission you can add project commission rules with the round plus button. The following fields can be defined for each rule. Fields marked with an asterisk are essential for the function of a rule:
- from date*– This defines the start date of the rule from which this rule is applied by EMPPLAN.
- Limitation – A rule can be limited to an event user or a team here if required.
- Project commission* – An absolute amount in your default currency is entered here.
- Project commission type* – The following types are available here:
- per event (regardless of its duration)
- per hour (based on check-in times or optionally scheduled times)
- per hour (from the time field, in which the time in hours must be entered manually)
- per transaction
- Name – if defined, this item name will appear on invoices instead of project commission, e.g. event fixum or similar.
- to – optional to date, which can end the rule, e.g. if the project continues but no more commission is to be paid on the basis of this rule
- Description – description text that can be used in EMPPLAN contract management
- Cost center – information to assign invoice items arising from the rule to a cost center; is provided in the invoice item export
- G/L account – information to assign invoice items resulting from the rule to a cost center; is provided in the invoice item export
- Apply additional rules – option to create rules in a combinable manner; this allows several rules to be executed simultaneously and a graduated commission to be realized; this option makes sense if a condition is also added
- Add condition – The rule is only executed if one of the following conditions is met.
- from transactions
- from transactions* – Number of transactions from which the rule should apply
- per – Here you can select per month and per event
- in product group – Here the condition can be limited to transactions of a certain product group.
- reported in location group – Here the condition can be limited to a location group.
- from turnover (gross)
- from turnover (gross)* – Absolute amount in your standard currency from which the rule should apply
- per – Here you can select per month and per event
- in product group – Here the condition can be limited to transactions of a certain product group.
- reported in location group – The condition can be limited to a location group here.
- from transactions
Existing rules can be edited by clicking on the pencil icon. Please note that rule changes no longer have any influence on events that have already been settled. If you still wish to do this, the affected invoices or credit notes must be canceled and recreated.
If you have activated commission validation in the EMPPLAN settings, eMPPLAN-wide validation of affected rules is mandatory. Product promotion commissions cannot be validated. If commission validation is activated, only rules validated by another admin will be executed. Rules that are not validated are not executed. Validation must be carried out by another admin who is different from the creator of the rule.
Check-in commission
Under Check-in commission you can add check-in commission rules with the round plus button. A check-in commission remunerates a timely check-in at an event. You can define the period for a timely check-in at project level in the Payment profiles tab under Earliest check-in and Latest check-in. This allows you to motivate event users to arrive at the location and check in at the planned start time. You can enter the following data for each rule:
- from date* – The date from which the rule should be active.
- Check-in commission* – The remuneration as an absolute amount of your standard currency for a timely check-in
- Description – Description text that can be used in EMPPLAN contract management
- Cost center – Information to assign invoice items resulting from the rule to a cost center; is provided in the invoice item export
- G/L account – information to assign invoice items arising from the rule to a cost center; is provided in the invoice item export
Reporting commission
Under Reporting commission you can add reporting commission rules with the round plus button. A reporting commission remunerates a timely submission of the report for an event. You can define the time period for timely submission directly in each rule. In this way, you can motivate event users to submit their complete report on time. You can enter the following data for each rule:
- from date* – The date from which the rule should be active.
- h – Period in hours from the planned end of the event
- Minutes – Period in minutes from the planned end of the event
- Description – Description text that can be used in EMPPLAN contract management
- Cost center – information to assign invoice items arising from the rule to a cost center; is provided in the invoice item export
- G/L account – information to assign invoice items arising from the rule to a cost center; is made available in the invoice item export
- Event statistics – reporting field that must always be filled out in order to receive the commission
- Reporting commission* – The remuneration as an absolute amount in your standard currency for timely submission of the report
Top Stop
Under Top Stop you can add a Top Stop rule with the round plus button. A top stop rule limits the remuneration per event. You can enter the following data for each rule:
- from date* – The date from which the rule should be active
- Select team – Limitation to one team
- Top Stop* – The maximum reward as an absolute amount of your standard currency for an event
History
The history documents changes to commission rules at project level for traceability purposes. The following data is collected for each rule change:
- Date and time
- Old value
- New value
- New user
- Rule
- Action
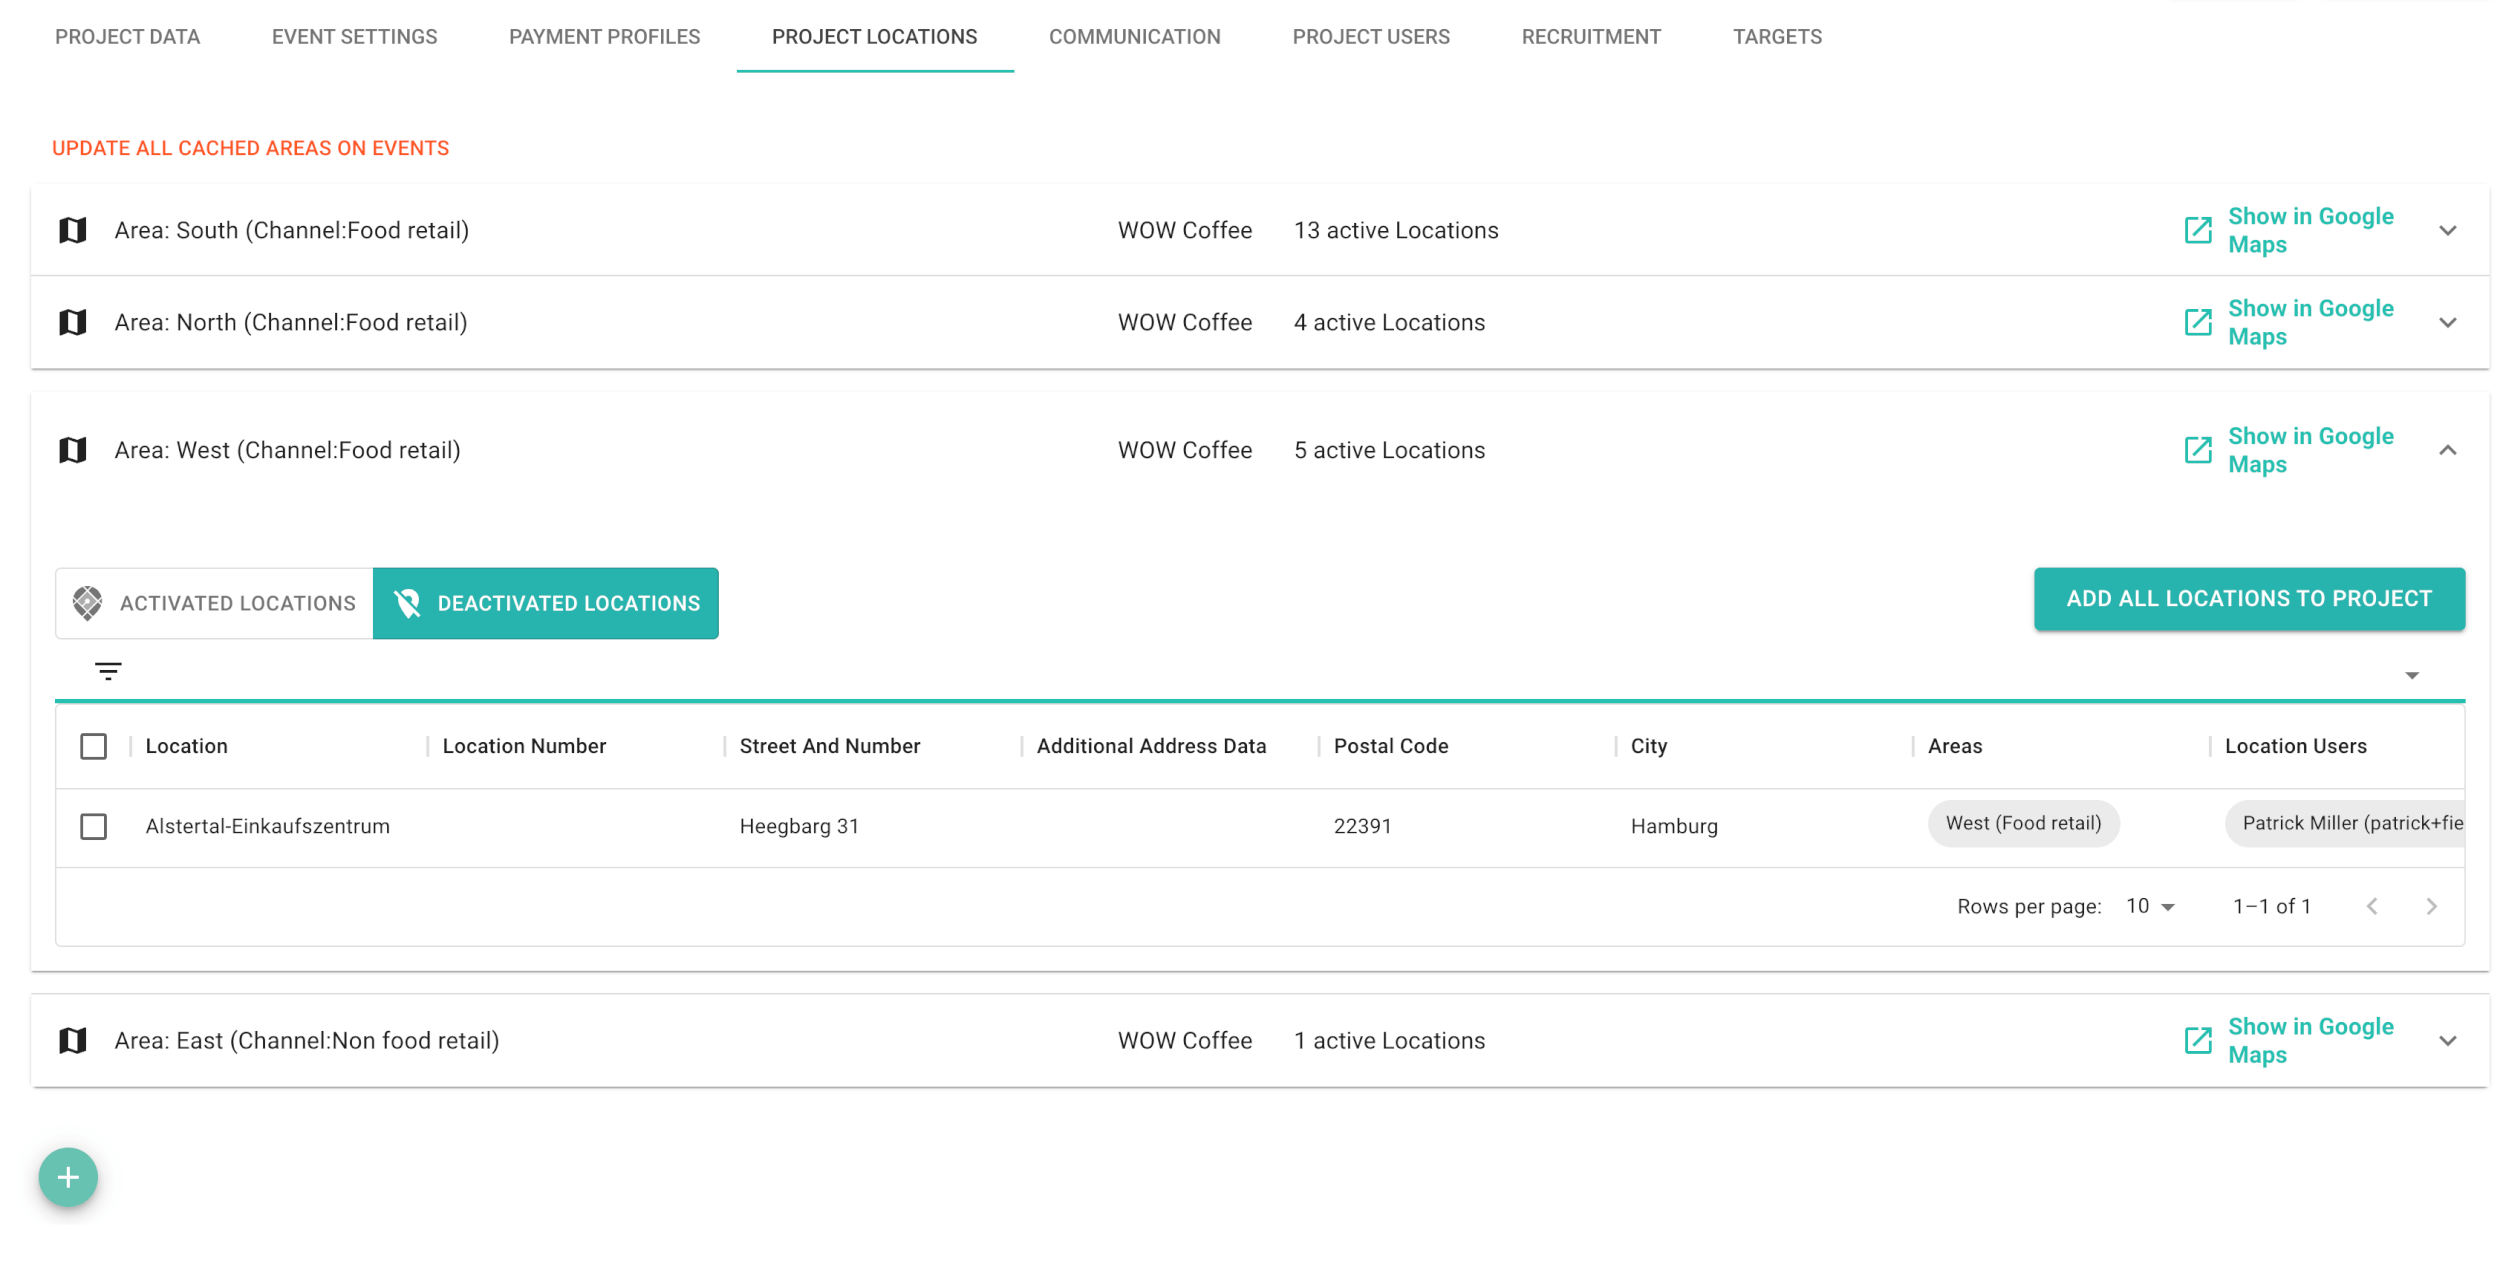
Here you can activate the desired project locations in which you would like to hold events on this project. You can make a selection from all the locations created in EMPPLAN. You must also specify the structure (in which channel and area) in which you want to work. This affects all statistics and also the event view and authorization for customer users, as customer users can be assigned to channels and/or areas, for example, and are therefore limited to locations and events that lie within their area of responsibility.
You can now only activate the locations that are relevant for the event booking on your project. Click on the round plus button:
- Select brand
Select the customer brand that this project is about. - Select channel
Based on your selection of brand and channel, these now appear as filters above the resulting locations. - Select area
Select the area in which you want to add locations. Some locations may be assigned to different areas. Therefore, you must now select an area that you would like to use for the locations to be activated. - In the Inactive locations area, you can now either select individual locations using the checkbox or simply add all filtered locations using the green button. All location-related filters are available for filtering.
- The Active locations area now shows you a list of all bookable locations. Events can only be created in active project locations. Locations that have already been activated can be removed from the project with just a few clicks, either selectively or in bulk.
Project request and project documents
This content is sent to the promoters you have selected by e-mail to request them. Uploaded project documents can also be permanently viewed by project users via their dashboard
Project support e-mail
Email – Here you can enter a specific email address that is stored as a reply recipient in project-specific emails. If an event user replies to one of these emails (e.g. reporting rejected email), the email is sent directly to the project team.
Send appointments to logged-in users – Do you use the event group communication feature? Then you can use this option to automatically receive an email including an appointment file so that you can add an event appointment to your own calendar with a single click. This option is mainly used for field service projects in which field service employees create their own appointments
Event briefing
This content is displayed to event users at their events. Here you can maintain texts and attachments so that rules of conduct, product information, promotional information, etc. can be communicated transparently. The information stored here is made available to all project users from the time of the event request on the respective event details page.
If you have event-specific information, you can maintain these briefing details when creating the event within the event group in the so-called event briefing
Event e-mail notifications
Here you can configure the actions for which event users should receive an email. All options are activated by default. Possible triggers are:
- New event published
- Delete event group
- Reporting accepted
- Reporting rejected
- Event series created
- Event series deleted
- Checked-in by supervisor
Management of content templates
EMPPLAN has a content and template editor. In the content template management area, you can manage textual content that can be used as templates in project communication on the event groups (Communication tab). The associated template editor can be used by the EMPPLAN support team or by experienced users with html knowledge. Please contact the support team for more information.
Possible applications for the use of such content templates are, for example, the sending of serial e-mails or faxes with dynamic content. Do you want to inform a store manager about a promotion in his store in advance, for example? Then you can save a lot of time with this feature. It is possible to use placeholders so that all event and location data can be dynamically compiled in one document. By adding your own templates, the design-compliant output of information via pdf and/or FAX [Premium Feature] is possible.
With the round plus button you can add a new content template with the following data:
- Content template – Name of the template, e.g. location fax for tasting promotion, appointment rescheduling etc.
- Design template – If you have created an individual design with the EMPPLAN Template Hero, this can be called up here. If you do not specify this, the EMPPLAN design will be used.
- E-mail subject – Here you can define a subject template for sending via e-mail. Placeholders are possible.
- E-mail / note / FAX content – Define your content here. Dynamic content such as links or access to event, user and location data via placeholders is also possible.
Once successfully created, the content template can be accessed in the communication staff on the project’s event groups. Please contact the EMPPLAN support team if you have any questions.
Please note that content templates can always be accessed globally in your EMPPLAN instance. This allows you to activate the same templates on many projects, if desired.
You have the following options via the action menu:
- Deactivate content template
- Activate content template
- Add content template to project
- Remove content template from project
- Delete content template
Under project users, you can specify which users from your database should be used to work on this project. It is important that, for example, merchandisers, promoters, salespeople, sales representatives and also customer users are added to the list of project users so that they can perform their tasks according to their individual authorization within EMPPLAN.
To do this, go to the Available users tab and select all relevant users.
AVAILABLE USERS tab: In the action menu in the gray area, you can perform the following actions for previously selected users:
- add to Sed Cards – Add the selected users to the digital, project-specific SedCards website to present potential users to your client digitally.
- remove from SedCards – Here you can remove the users from the SedCards website.
- Send project request email – Use this function to request the previously selected users with the content defined in the Communication tab under Project request and Project documents. The users will then receive an email with all the content. This email also contains an action button. Clicking on this takes you to your EMPPLAN dashboard to approve or reject the project request. After approval, the users appear with a corresponding label in the project users tab and can be booked for events. Users who have declined cannot be booked and can then be removed from the project by admins. Use this function to pre-qualify users for a project.
- add manually – This function adds users to the project. The user does not receive a notification about this action. The user can then be requested / booked for events.
Tab PROJECT USER: In the action menu in the gray area you can perform the following actions for previously selected users:
- add to Sed Cards – Add the selected users to the digital, project-specific SedCards website to present potential users to your client digitally.
- remove from SedCards – Here you can remove the users from the SedCards website.
- Resend project request email – This function sends a reminder email for the project request.
- Send e-mail with individual content – Here you can create a serial mailing. Placeholders are available.
- remove from project – This function deletes the user from the list of project users. No more new events can be created for the user. Existing events are retained.
You can perform the following actions in the SedCards menu in the grey area:
- (Re)Generate SedCards URL – (Re)Generate the URL of the project-specific SedCards website here to access it initially. When you create the new URL, you simultaneously invalidate the old URL. Users who have received the old link will then no longer receive any data via it.
- Open SedCards URL – Open the project-specific SedCards website. On this website, you present the potential project candidates to your customer. You define which user data is presented via user management using the Individualize user profiles function.
Would you like event users without an EMPPLAN account to be able to apply directly to you for a project? Then use the applicant management! Proceed as follows:
- Define user rights and user type
Select the user type Agency user and the user right Promoter. - Create
Save the information and use it to create a link and an application form.
After this initial creation, you can use the following functions:
CampaignID – Do you work with external platforms to generate new applicants? Then you can use this feature to monitor the quality of your campaigns on all platforms using the campaign ID in the applicant dashboard. EMPPLAN offers you independent success tracking by campaign, source (e.g. platform 1, social media channel X etc.), advertising media and applicant quality. For example, you can evaluate how many applicants have successfully completed the double opt-in process.
Share link – Use this link on all platforms to record all tracking details correctly
iFrame configuration – Here you can make the technical settings for the project application form. This should be done by experienced web admins.
Project application form – Here you can create your own project-specific application form for your website. The applicants generated there land directly in your EMPPLAN instance and are displayed in your project as applicants in the project user list.