Location Management
Channels

A channel is a virtual area or a virtual structure. Customers or brands usually have different budgets for different channels. To map this industry standard, EMPPLAN has a channel level. An example of this could be a “Specialty retail stand-alone” channel and a “Specialty retail in shopping centers” channel.
A channel is always linked to a country and a brand, which you must assign when adding a new channel. Once you have activated a channel, you can assign territories to this channel. The respective event locations for e.g. promotions, market or field service activities are then located in the areas.
Specific budget planning (customer budget management) can be mapped via the use of channels. In this way, a channel can be linked to specific budgets in order to visualize live customer access to budget consumption per channel, but also per area
You can add a new channel with the round plus button. The following data can be defined under Add new channel :
- Channel name
- Select country
- Select brand
- User
In practice, at least one channel is created for each customer brand. This is followed by the creation of areas and locations.
The assignment of users enables the mapping of sales structures on the customer side. In this way, the responsible marketing directors can be assigned to one or more channels. Depending on their authorization, they can then view project and brand-specific event, reporting and sales data for all locations that have been assigned to these channels and their territories.
A channel assignment is always above a territory assignment. If a marketing directoris assigned toa channel, they can find out about all activities in the subordinate territories. However, the prerequisite is that the marketing director is also a project user and is also assigned to the corresponding brands. You can find out more about this at: https://www.empplan.com/how-do-i-create-customer-users/
You can use the action menu in the grey area to show deactivated channels again .You can also deactivate or delete channels.
A channel can be added, deactivated, activated or deleted in EMPPLAN. When you create a new channel, it is automatically activated.
You can deactivate or delete channels if you no longer need them. This keeps your channel view clearer. Of course, you can also reactivate a deactivated channel at any time.
Deleting a channel is permanent and means that it cannot be reactivated.
In the filter bar above the channel list, you can filter by channel to quickly find the desired structure.
Areas
An area is a virtually defined area that can be used for market organization. At least one channel must be assigned to an area so that it can be used.
The assignment of users enables the mapping of sales structures on the customer side. In this way, the responsible sales representatives can be assigned to one or more territories. Depending on their authorization, they can view project and brand-specific event, reporting and sales data for all locations assigned to these territories. However, the prerequisite is that they are also project users and are also assigned to the corresponding brands. You can find out more about this at: https://www.empplan.com/how-do-i-create-customer-users/
You can add a new area with the round plus button. The following data can be defined under Add new area :
- Name
- Number
- Select channel
- User
You can use the action menu in the grey area to show deactivated channels again .You can also deactivate or delete channels.
An area can be added, deactivated, activated or deleted in EMPPLAN. When you create a new area, it is automatically activated.
You can deactivate or delete areas if you no longer need them. This keeps your area view clearer. Of course, you can also reactivate a deactivated area at any time.
Deleting an area is permanent and means that it cannot be reactivated.
In the filter bar above the area list, you can filter by area to quickly find the desired structure.
Locations
A location is a location, e.g. of a store or an event location, which can be stored with a physical address. A location must always be assigned to at least one area and can be assigned to one or more location group(s). Locations can be assigned to any number of areas
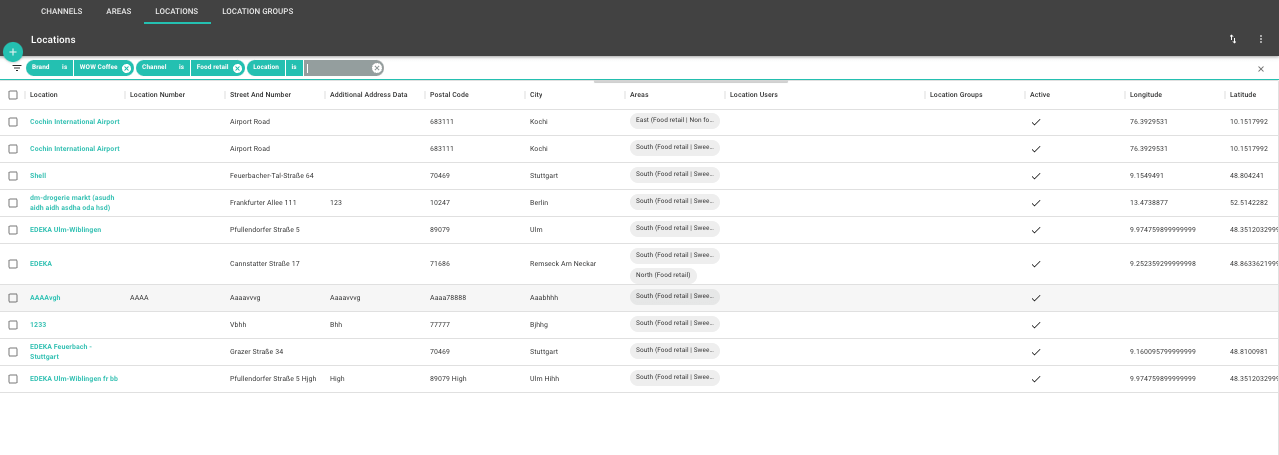
You can add a new location with the round plus button. The following data can be defined under Locations :
In the first field you can start a Google Places search, which transfers available data from Google directly into the following fields:
Address of the location
- Country
- Location name
- Company name
- Street name No.
- additional information
- ZIP CODE
- Town
Further data
- Website
- E-mail address
- Phone number
- Fax number
- Location no.
- Location groups
- Notes
Areas
Assign at least one area to the location here. Please note that you must have created the area and the corresponding channel beforehand.
Location user
Here you can associate location users and, if required, customer users.
Linked product groups
Assign product groups to your locations to make your reporting even better. Sales representatives can then submit their report for specific product groups only.
Location contact person
Add location contacts to give your event users at their events the opportunity to get in touch with them directly.
Further data
Make EMPPLAN your EMPPLAN! Extend the standard data set with additional data fields, which are then available to you for maintenance at all locations. Filters, exports and search functions are automatically expanded to include these new fields. You can also make these new data fields available to event users, e.g. to display customer numbers from third-party systems. You can create the following data for each field:
- Field name
- Technical field name
- Brands
- Project association
Warehouse management
Here you can see which products are stored in this location. You can also make stock bookings.
Gallery
Store documents and pictures of the location here.
Reporting
Here you can view the last events in this location as well as reports.
You can import new locations via the action menu in the grey area, by selecting your own files and EMPPLAN will check them and add them (if not yet stored). Please note that a channel must also be created first for this, as you must specify this when importing your address lists.
You can find an FAQ article on importing locations here: https://www.empplan.en/how-can-you-import-in-empplan-locations-or-update-it/
You can add locations to projects or remove them from projects via the action menu in the gray area. Please note that filters must be set for both processes.
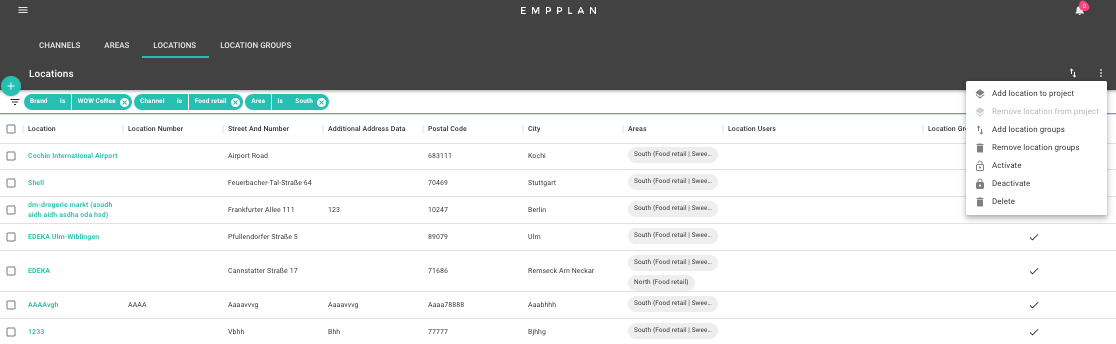
You can now only activate the locations that are relevant for the event booking on your project:
- Select brand
Select the customer brand that this project is about. - Select channel
Based on your selection of brand and channel, these now appear as filters above the resulting locations. - Define area
Select the area in which you want to add locations. Some locations may be assigned to different areas. Therefore, you must now select an area that you want to use for the locations to be activated. - You can now either select individual locations via the checkbox or add or remove all filtered locations via the action menu without an active selection.
A location can be added, deactivated, activated or deleted in EMPPLAN. When you create a new location, it is automatically activated. Deactivated locations can be shown again using the “Active is No” filter.
You can also deactivate, edit or delete locations if you no longer need them. This keeps your location view clearer. Of course, you can also reactivate a deactivated location at any time.
Deleting a location is final and means that it cannot be reactivated.
You can filter for locations in the filter bar above the location list.
Location groups
Location groups are used to segment locations. Each location can be assigned to one or more location groups.
Using the location group, it is possible to structure legal entities, e.g. to create owners of a supermarket chain and assign them to the corresponding locations (market addresses).
It is also possible to define brand names of chains as a location group in order to quickly find the right stores later using the filter functions.
You can also use location groups for segmentation in the payment profiles. For example, you can define the daily rate at project level depending on the location group. This means that a promoter can receive more basic commission (project commission) in one market than in another market in a different location group
You can add a new location group with the round plus button.