for sales representatives in Door-2-Door sales
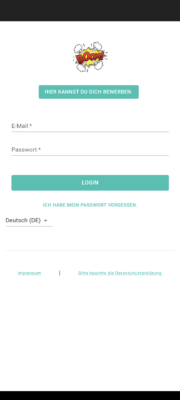
- You will receive a request to join EMPPLAN via an onboarding email or push notification on your cell phone. Please note that the link is only valid for a certain period of time. If the link no longer works, follow step 2.
- If your onboarding link has expired, you can have a new one sent to you. To do this, open your browser and visit the EMPPLAN instance of your client/agency, e.g. https://brand.empplan.io. Then click on the link “I have forgotten my password” and enter your e-mail address. You will then receive the onboarding e-mail. If you have not received an e-mail, you can also register again with your client/agency. Then follow step 3.
- If you do not yet have an account with your client/agency, visit their EMPPLAN instance, e.g. https://brand.empplan.io. Then click on the “You can apply here” button and enter all your details. You will then automatically receive your onboarding e-mail to set your password.
- As soon as you are logged in, you should ideally start updating your profile details straight away. Click on your name in the menu and enter all the information marked as mandatory(*).
- To settle your commission directly via EMPPLAN, enter all details in the “Payment data & tax” tab.
- If you would like to delete your profile, please contact your client/agency directly. EMPPLAN and your client are committed to handling your data in accordance with the law at all times.
Hybrid mode/offline mode
You can use the slider to switch EMPPLAN to offline mode. This is only recommended if you have very poor network coverage. In offline mode, the map view cannot be used, only the list view. As soon as you are traveling in areas with better network coverage, you can temporarily switch back to hybrid mode. Your data (running lists/report data etc.) will then be transferred and updated.
Map mode
You can select the map view in 3D or satellite image here.

By clicking on Customers, you can view the stored (address list) running list. Depending on the agreement with your client, you can create your own addresses that are not on the stored address list via Customer, or create them yourself in map view by clicking on a building (addresses found are displayed as a selection field).
At the top right you can select the map view or list view. The data is the same. The map of the map view can be rotated with 2 fingers and the angle view can also be changed. You can also select satellite view or 3D view in the settings. In the map view, the stored addresses are displayed as data points on the respective building.
Note: When working in offline mode, the map view cannot be used, only the list view.
The crosshair shows you your current location on the map or the street list is sorted based on your current location (the next address is then at the top of the list view).
The filter helps you to filter data accordingly (e.g. you can use it to find the right address on the map).For example, you could display all addresses in the course of a project for which you have not yet won the customer: Lead status: is not, label: customer won, set filter). You could also display streets: e.g. street name: main street, sort by house number, set filter.
You can also use the sorting function here and sort by street name, house number or last update.
Note: If you are working in several projects, always make sure that the project for which you are currently working is displayed here.

By clicking on the doorbell symbol, EMPPLAN documents when you rang the customer’s doorbell and how often (so it makes sense to click on the doorbell symbol in EMPPLAN if the actual doorbell ringing takes place at the front door). This allows you, for example, to sort by all customers you have rung less than twice or to identify times of day when nobody was at home.
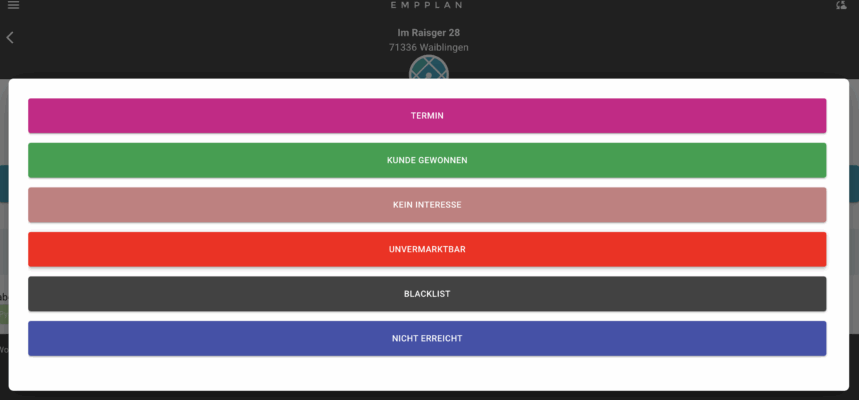
You can use these selection fields to enter the status of the customer. This is then displayed in the overall view in front of the address and you can also filter based on the status.

Click on Edit to enter and edit all customer data. When you click on UPDATE, the data is saved. As soon as a customer has been entered by name, the customer name appears here
Products or services sold can be selected under shopping cart.
- Select product
- Enter order number
- Add product
- if necessary, fill in individual fields (e.g. electricity consumption per year, customer signature, etc.)
- Add
- Customer (expandable field) Check customer data and adjust if necessary
- FINALIZE SALE
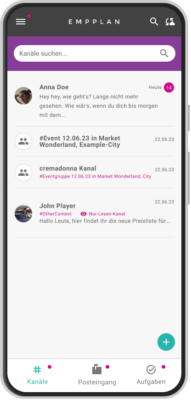
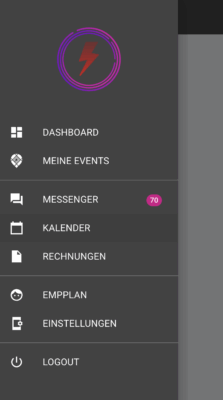
The EMPPLAN Messenger is the communication center in EMPPLAN. Depending on your approval, you can communicate directly with the back office on an address-related basis, receive instructions or notifications or, if applicable, be a member of a (sales) group.
Under CRM you will see the customer addresses for whose data record you have already entered notes in the comment field (e.g. customer needs the quote by Friday) or the customer addresses for which the back office has queries (e.g. customer signature missing, please add).
The EMPPLAN billing module guarantees correct and fast billing.
After data verification in the back office, your invoices with the commission data are listed here under the menu item Invoices. Orders subsequently canceled by the customer/non-concluded orders would also be visible here.
Protect your data and comply with local laws
Especially if you are not working with your own device, you must log out before another user can use the device. Only when the logged-in user logs out will the local data storage be properly emptied to prevent unauthorized data leakage. EMPPLAN also recommends this procedure for your own devices.
Your contractual partner wants up-to-date data
Perform the synchronization as often as possible, but at least at the beginning and end of the working day, ideally before check-in and after submitting the report for each event.
Be careful with optimization apps and when deleting local storage data from your browser
If you delete local data by resetting your browser or deleting local and cached data, you always do so at your own risk. Lost data cannot be restored if it has not been synchronized beforehand.
Contact EMPPLAN Support if you have any problems
Please first contact EMPPLAN Support at support app@empplan.com if you have problems with synchronization. If a problem occurs during synchronization, please send us the complete log protocol. Only then can we help you.
Frequently asked questions about the EMPPLAN app
Your event report requires location live images / image uploads with localization data and you have problems with this? Read here how you can proceed