Is it possible to import users into EMPPLAN? [User import]
1. Preparation of your data
Importing or updating users is very easy in EMPPLAN. You can download an example CSV file here. Your data must contain at least the following columns:
- E-mail, e.g. john@doe.de (column title freely selectable)
The e-mail is the leading ID in EMPPLAN for imports or updates of user data. Of course, it does not only make sense to import e-mail addresses of users.
Here you will find the most common data, which you can of course extend as required using the “Customize user profile” function. All column titles are freely selectable and can be manually assigned to the corresponding EMPPLAN fields. (see 2.):
- Salutation with the values: ##FemaleFormOfAddress for female, ##MaleFormOfAddress for male or ##DiversFormOfAddress for diverse
- First name
- Surname
- Date of birth
- Company, e.g. contractor UG
- Street no.
- Address suffix e.g. building on the right
- ZIP CODE
- Town
- Country e.g. DE for Germany
Please use the ISO 3166-2 standard here. For more information see: https://de.wikipedia.org/wiki/ISO-3166-1-Kodierliste - Telephone
- Mobile phone
- Fax number
- Nationality
- Skin type
- Hair color
- Size
- Clothing
- Jeans size
- Shoe size
- Visible piercing with the values: true for yes or false for no
- Visible tattoo with the values: true for yes or false for no
- Work experience
- Subject to VAT with the values: ##ValidatedForVAT for Yes or no value for No
- VAT. VAT ID
- IBAN
- BIC
- and many more…
Once all the data has been entered, save the file as a CSV in UTF-8 format. To do this, select Save as in Excel.
![]()
Your data is now ready to be imported into EMPPLAN
2. The data import from users
- Open the USER MANAGEMENT
- Click on the double arrow icon in the table header.
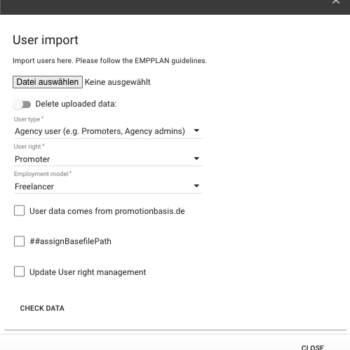
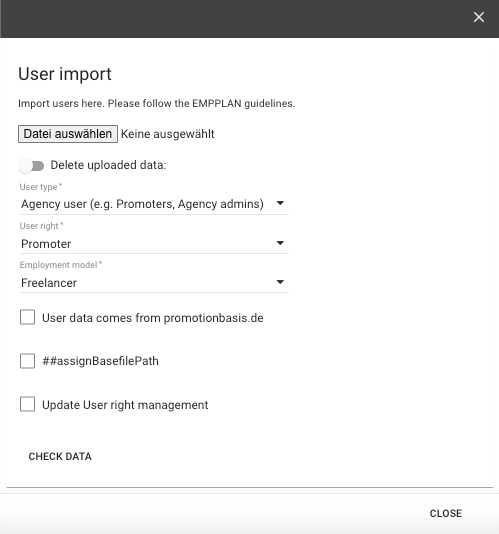
- Select the file to be imported and select values for user type, user right and employment status and click on CHECK DATA.
- Carry out a field mapping or field assignment. Of course, you can save the mapping as a profile so that you only have to select the profile the next time you import. Please note, however, that the column name in your source file must not change. When mapping, you define which fields in your file are to become which data in EMPPLAN. The field mapping in detail:
- E-mail: Select the EMPPLAN field email here.
- Salutation: Select the EMPPLAN field formOfAddress here.
- First name: Select the EMPPLAN field firstName here.
- Last name: Select the EMPPLAN field lastName here.
- Date of birth: Select the EMPPLAN field dateOfBirth here.
- Company: Select the EMPPLAN field residentialAddress.company here.
- Street No.: Select the EMPPLAN field residentialAddress .address here.
- Additional address: Select the EMPPLAN field residentialAddress.additionalAddressline here.
- Zip code: Select the EMPPLAN field residentialAddress.zipCode here.
- City: Select the EMPPLAN field residentialAddress.city here.
- Country: Select the EMPPLAN field residentialAddress._country or billingAddress._country for the billing address.
- Phone: Select the EMPPLAN field tel here.
- Mobile: Select the EMPPLAN field mobile here.
- Fax: Select the EMPPLAN field fax here.
- Nationality: Select the EMPPLAN field nationality here.
- Skin type: Select the EMPPLAN field body.skinPattern here.
- Hair color: Select the EMPPLAN field body. hairColor here.
- Height: Select the EMPPLAN field body. height here.
- Clothing: Select the EMPPLAN field body.confectionSizeOuterClothing here.
- Jeans size: Select the EMPPLAN field body .confectionSizePants here.
- Shoe size : Select the EMPPLAN field body. shoeSize here.
- Visible piercing: Select the EMPPLAN field body. isPiercingVisible here.
- Work experience: Select the EMPPLAN field workExperiences here.
- If you want to import subcontractors from contractors, e.g. other agencies:
- Subcontractor feature: 1 for Yes, 0 for No (default value) – Select the EMPPLAN field officialIds.isSubcontractor here.
- Subcontractor may not confirm contracts: 1 for Yes, 0 for No (default value) – Select the EMPPLAN field officialIds.skipContractsForSubcontractor here.
- Other data fields: Of course you can also import other data fields. These do not have to be assigned. Always use the technical field name you have assigned yourself in the column title. EMPPLAN then automatically assigns the field correctly.
- Now start the import by clicking on the button and take a look at the import log.
Hints & tips
Oops...
Something went wrong during the import and you want to delete data? In the dialog (see step 2. point 3.) select “Get rid of it. Delete uploaded data!”. Then continue as usual and start the import. Based on the assigned e-mail address, the user accounts will be deleted.
promotionbasis.de Import
If you receive data from promotionbasis.de you can set a checkmark in the dialog (see step 2. point 3.). The data import takes place automatically, without any field assignment. You can import both CSV and packed zip data from promotionbasis.de directly into EMPPLAN.
More data
Additional columns are of course possible. This allows you to store additional data at any time, which you can then view in the user with fields you have created yourself. Please remember to name the column headers appropriately and only use letters, numbers and the minus sign, e.g. SAP employee number.
To make the data visible in EMPPLAN after import, you can simply create the fields in any user profile. For the technical field name, use exactly your column name from the import, e.g. SAP employee number. As soon as you have created the field, the imported data will automatically appear on the users